A Rainy Afternoon and a Box of Scraps: Make a Hand-Bound Notebook
Make a hand-bound notebook from paper scraps with a calm rainy-afternoon plan, simple cover choices and a neat binding made with household supplies.
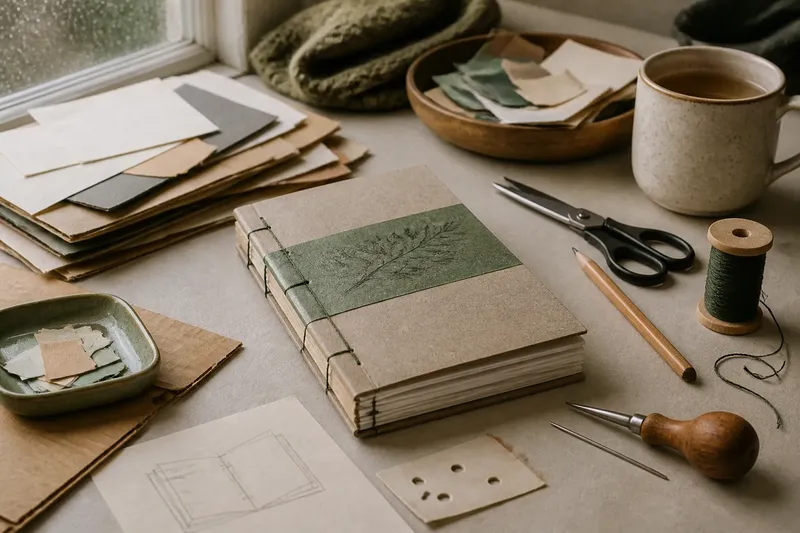
The common mistake with a hand-bound notebook is starting to cut before checking whether the scraps will fold together. That can leave pages jutting past the cover or a stack too thick for the thread. Make a hand-bound notebook by beginning with a quick sort, then letting the afternoon’s available paper determine its size and purpose.
This is a small, flexible project for a rainy afternoon, not a demand to use every offcut in the box. Gather paper, a piece of card or a light packaging board, thread, a needle, a ruler, scissors, a pencil and a blunt point such as an awl or a large needle. A folded pamphlet stitch is a good choice: it holds a modest stack together without glue and leaves the spine visible.
What should you gather before you begin?
Set the materials on a clear table. Look for paper that can fold without cracking or crumbling. Useful sources include the blank backs of printed sheets, leftover drawing paper, envelopes opened along their seams, and pages from a notebook that has unused sections. Remove staples and check that no important writing is on the reverse.
Choose the card for the cover. A cereal box, a paper folder or a piece of lightweight packaging can work if it bends cleanly. Avoid brittle card that splits at the fold, and set aside anything with a greasy or damp patch. For the binding, ordinary sewing thread is sufficient; embroidery thread gives a more visible line, while thin thread makes a quieter spine. A sewing needle should pass through the folded stack without force.
Keep a scrap of the chosen paper beside the work area. It will be useful for checking the fold and making a tiny hole guide. If you have a cutting mat and craft knife, they may help with trimming, but scissors are enough for a modest notebook. Use the method and tools that suit your materials; where a product’s label or maker’s instructions apply, follow them.
How do you choose pages that belong together?
Decide what the notebook is for before you assemble it. A pocket for quick notes benefits from plain, forgiving pages. A place for sketches might use drawing paper for the centre and lighter paper at the outside. If the stack is mixed, keep the heavier sheets near the centre rather than letting them push against a thin outer page.
Fold each candidate sheet in half and press the crease with a ruler’s edge or a clean fingernail. The folded size sets the notebook’s proportions. Sheets do not need to match exactly, but they should sit reasonably close to one another at the fold. Put the most uneven pieces aside for a later collage or test fold rather than forcing them into this binding.
Make a small stack and check its thickness before adding more. Several folded sheets form nested layers, called signatures; for this simple notebook, one nested stack is enough. Too many layers can make sewing awkward and leave the pages springing open. A slim notebook is easier to bind and can still hold useful notes or small drawings.
What can you do during the afternoon?
Let the project follow the natural pauses of the afternoon. The order below keeps the fiddly decisions short, so there is time to make the notebook without turning the table into a long-term workshop.
- While the kettle boils: sort paper into keep, test and set-aside piles. Remove staples and check the reverse sides.
- After a first cup of tea: fold one sample sheet, choose the finished size and make a stack that stays manageable.
- Before lunch or a snack: cut the cover card to match the folded pages, then crease it gently along the spine.
- In the quieter middle stretch: mark and pierce the binding holes, then sew the folded stack to the cover.
- As the afternoon winds down: trim only obvious overhangs, write a title inside, and leave the notebook under a book while the folds settle.
These are prompts rather than a strict timetable. If the paper needs more sorting, stop there and continue later. A half-made stack is easier to revisit than a rushed binding with holes in the wrong place.
How should you make the cover and binding?
Lay the folded pages inside the open cover, with their creases aligned. Mark the top and bottom edges of the stack on the card, then trim the cover so it sits close to the pages. A slight margin is useful, but a very oversized cover can catch on the corners of the inner sheets.
Use the fold as a guide for three holes: one near each end and one between them. Keep each hole a little way in from the edge so the paper is not likely to tear. Put the stack on a folded scrap of card while piercing, and press the point through steadily rather than forcing it. Repeat the holes through the cover and pages while they remain aligned.
Thread a needle with a length of thread that is comfortable to handle. Start from the outside at the centre hole, leaving a tail. Sew through one end hole, return through the other end hole, and bring the needle back through the centre. Tie the working thread to the tail with a firm, tidy knot inside the middle fold. The thread should hold the pages close without cutting into them. If the stack shifts, loosen the knot and realign it before trimming the ends.
Say you have a few blank printer-paper backs, two sheets of coloured drawing paper and a thin biscuit-box panel. You fold the paper into one slim stack, use the coloured sheets at the centre, and cut the panel to cover it. With three aligned holes and a simple pamphlet stitch, the expected result is a small notebook with a visible thread spine and pages suited to both notes and sketches.
How can you make the pages and cover feel useful?
Keep decoration in service of the notebook’s job. A narrow strip of paper pasted to the cover can become a title band; a small piece of patterned packaging can mark the front without adding much bulk. If you use glue, apply it sparingly and let it dry before closing the book, so the pages do not stick together.
For the inside, add a simple ownership line or a small contents prompt on the first page. A few ruled lines can be drawn with a ruler if the paper is plain. Leave most pages open unless you already know how you will use them. Heavy decoration can make a thin stack stiff, and wet materials can buckle delicate paper.
Choose one small detail that makes the notebook easy to recognise: a coloured thread, a hand-lettered title, or a clipped corner on the cover. Use only a corner that will not expose or damage the pages beneath. A restrained choice is also easier to repeat if you later make another notebook from a different batch of scraps.
What if the scraps do not behave as expected?
What if the paper tears at the fold?
Set that sheet aside and try a gentler crease on a fresh piece. Very dry or brittle paper may be better used as a cover decoration than as an inner page.
What if the pages are uneven?
Align the folds first, since the spine matters more than the outer edges. Trim small projecting corners with scissors after binding, taking care not to cut into the thread or remove too much from one page.
What if the thread is hard to pull through?
Check that the holes are open and aligned, then use a thinner thread or a needle with a smaller eye. Do not tug hard against a partly pierced fold, as that can enlarge the hole or split the paper.
What if the cover springs open?
Check whether the stack is too thick or the cover fold is too tight. Remove a sheet or soften the crease by opening and closing the cover gently; avoid forcing the spine flat.
How should you finish and keep the notebook?
Close the notebook and press it beneath a clean book while you clear the table. This helps the folds sit together. When you pick it up, open it gently at the centre and check that the knot remains secure and the pages turn without catching. If the binding feels loose, retie it rather than adding more thread over the existing stitch.
Put the finished notebook where its intended use will make sense: beside the telephone for messages, near drawing materials for sketches, or in a bag for loose thoughts. If it is meant for wet or messy work, choose sturdier paper and a cover that can tolerate handling. The scraps that did not fit can stay sorted for another project rather than being forced into this one.
A hand-bound notebook made from paper scraps works best when its modest purpose is clear. One careful fold, a balanced stack and a binding that holds without strain are enough to turn leftover material into a useful object. Keep the thread visible if you like; it is a reminder that the book was made to suit the paper you had on hand.